Summer peaches are something I wait for all year long. There’s nothing quite like biting into a juicy peach in July, but when peach season rolls around, I always end up with way too many. My family can only eat so many fresh before they start to turn. That’s when I turn to peach pie.
A good peach pie is the perfect way to use up a bunch of ripe peaches before they go bad. The filling gets thick and sweet in the oven, and those warm spices make the whole house smell amazing. Plus, nobody’s going to complain when you pull a golden pie out of the oven for dessert.
This recipe is straightforward and doesn’t require any fancy techniques. If you can slice peaches and roll out pie dough, you’re already halfway there. I like to make mine when I’ve got a lazy afternoon to spend in the kitchen, but it comes together pretty quickly once you get going.
Why You’ll Love This Peach Pie
- Fresh, seasonal flavor – This pie celebrates juicy peaches at their peak, creating a filling that tastes like summer in every bite.
- Perfect texture – The cornstarch creates a thick, jammy filling that won’t turn your pie into a soggy mess, so every slice holds together beautifully.
- Simple ingredients – You probably have most of these pantry staples on hand already, and fresh peaches are the star of the show.
- Crowd-pleasing dessert – Whether it’s a family dinner or a potluck, this classic pie always gets rave reviews, especially when served warm with a scoop of vanilla ice cream.
What Kind of Peaches Should I Use?
Fresh, ripe peaches are ideal for this pie, and you’ll want to look for ones that give slightly when you press them gently but aren’t mushy. Yellow peaches are the classic choice and give you that sweet, traditional peach pie flavor, while white peaches offer a slightly more floral taste if you want to mix things up. If fresh peaches aren’t in season, frozen peaches can work in a pinch – just make sure to thaw them completely and drain off any excess liquid before using them in your filling. When it comes to peeling, the skin will soften as it bakes, so you can leave it on if you prefer, though most people like to peel their peaches for a smoother texture.
Options for Substitutions
This peach pie is pretty forgiving when it comes to swapping ingredients:
- Fresh peaches: If fresh peaches aren’t in season, you can use frozen peaches instead. Just thaw them completely and drain off excess liquid before mixing with the other ingredients. You might need to add an extra tablespoon of cornstarch to account for the extra moisture.
- Pie crust: Store-bought crust works great if you’re short on time. You can also make a crumb topping instead of a top crust if you prefer – just mix flour, butter, and sugar until crumbly and sprinkle over the filling.
- Cornstarch: Tapioca starch or flour can replace cornstarch as a thickener. Use the same amount of tapioca starch, or increase to 8 tablespoons if using all-purpose flour.
- Granulated sugar: You can use brown sugar for a deeper, caramel-like flavor, or reduce the sugar to ½ cup if your peaches are really sweet.
- Cinnamon: Try nutmeg or a pinch of cardamom for a different spice profile, or leave it out completely if you want the peach flavor to shine through on its own.
- Egg wash: If you’re out of eggs, brush the crust with milk or cream instead for a golden finish.
Watch Out for These Mistakes While Baking
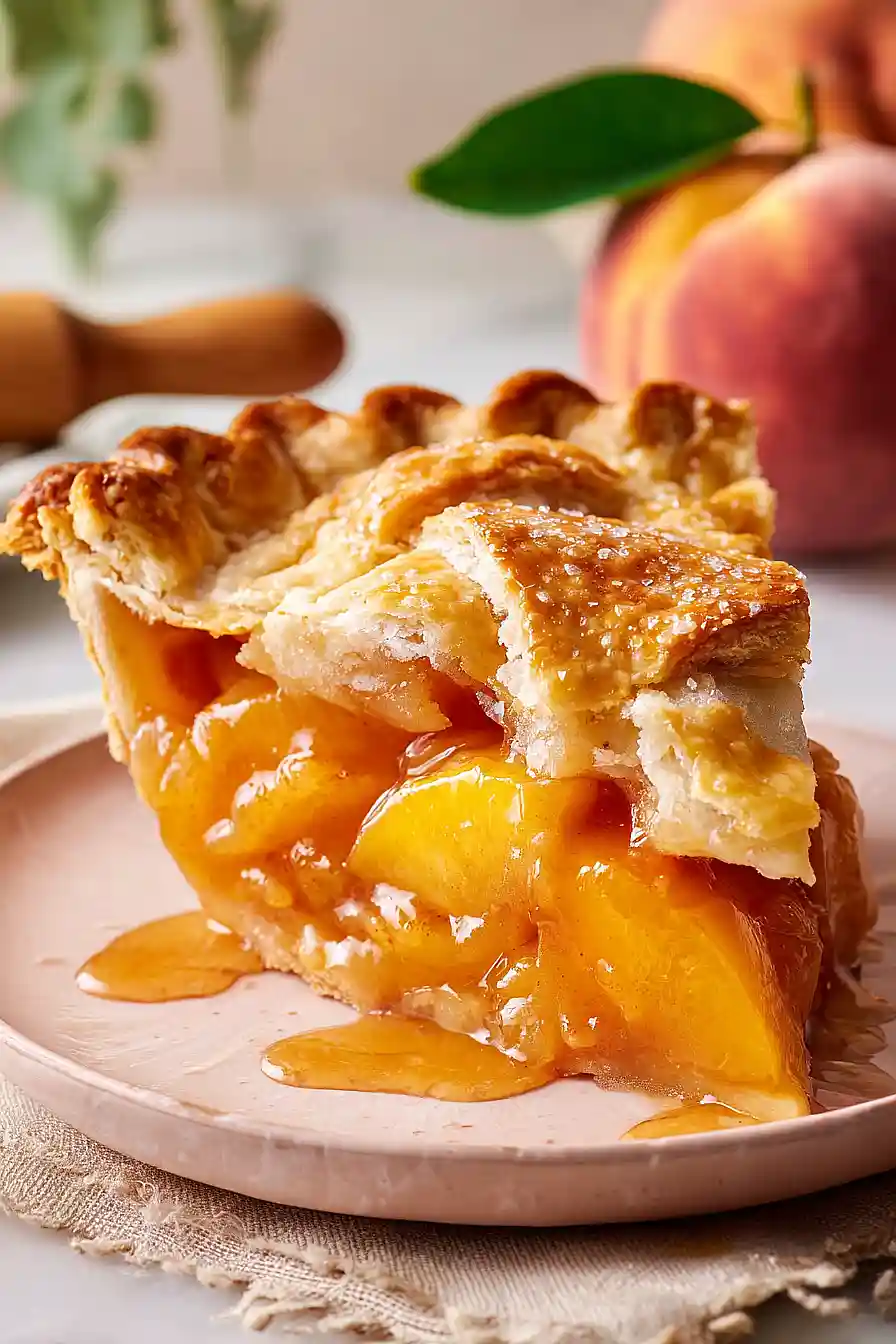
The biggest mistake people make with peach pie is skipping the cooling time – I know it’s tempting to dig in right away, but those 4-5 hours are necessary for the filling to set properly, otherwise you’ll end up with peach soup instead of sliceable pie.
Another common issue is using peaches that are too ripe or too firm, so look for peaches that give slightly when pressed but aren’t mushy, as overly ripe fruit releases too much juice and underripe peaches won’t have enough flavor.
Don’t forget to toss your peach slices with the cornstarch mixture right before assembling the pie – if you let it sit too long, the fruit will release juice and make your bottom crust soggy.
Finally, keep an eye on those crust edges during baking and add foil if they’re browning too quickly, and make sure your pie is bubbling in the center before you pull it from the oven, which tells you the cornstarch has activated and your filling will set nicely.
What to Serve With Peach Pie?
A warm slice of peach pie is pretty amazing on its own, but adding a scoop of vanilla ice cream on top takes it to another level – the cold ice cream melting into the warm pie filling is just perfect. If you’re not an ice cream person, a dollop of fresh whipped cream or even some Greek yogurt works great too, especially if you’re serving it for breakfast (no judgment here!). For a full dessert spread, I like pairing peach pie with a hot cup of coffee or sweet tea, which really complements those cinnamon and vanilla flavors. You could also serve it alongside other summer desserts at a barbecue or potluck, where it pairs nicely with grilled meats and corn on the cob.
Storage Instructions
Store: Keep your peach pie covered loosely with foil or plastic wrap at room temperature for up to 2 days. After that, move it to the fridge where it’ll stay good for another 3-4 days. The crust might soften a bit in the fridge, but the flavor is still great.
Freeze: You can freeze peach pie either baked or unbaked for up to 3 months. If freezing unbaked, assemble the whole thing and wrap it tightly in plastic wrap and foil before freezing. For a baked pie, let it cool completely first, then wrap well and freeze.
Serve: If you froze an unbaked pie, bake it straight from the freezer and add about 15-20 minutes to the baking time. For a frozen baked pie, thaw it overnight in the fridge and warm slices in the oven at 350°F for about 10 minutes to crisp up the crust again.
| Preparation Time | 40-50 minutes |
| Cooking Time | 60-70 minutes |
| Total Time | 100-120 minutes |
| Level of Difficulty | Medium |
| Servings | 8 slices |
Estimated Nutrition
Estimated nutrition for the whole recipe (without optional ingredients):
- Calories: 2700-3000
- Protein: 28-34 g
- Fat: 85-100 g
- Carbohydrates: 480-520 g
Ingredients
For the filling:
- 3 lbs peaches (peeled and sliced into 1/2-inch wedges)
- 3/4 cup sugar
- 6 tbsp cornstarch
- 1 tbsp lemon juice
- 2 tsp vanilla extract
- 1 tsp ground cinnamon
- 1/4 tsp ground ginger
- 2 tbsp unsalted butter, cubed
- 1/4 tsp salt
For the crust and assembly:
- 1 double pie crust (chilled)
For the egg wash and topping:
- 1 large egg
- 1 tbsp water (for egg wash)
- 1 1/2 tbsp turbinado sugar
Step 1: Prepare the Peaches and Spice Filling
- 3 lbs peaches, peeled, pitted, and sliced
- 3/4 cup sugar
- 6 tbsp cornstarch
- 1 tbsp lemon juice
- 2 tsp vanilla extract
- 1 tsp ground cinnamon
- 1/4 tsp ground ginger
- 1/4 tsp salt
Peel, pit, and slice the peaches into 1/2-inch wedges.
In a large bowl, combine the sliced peaches with sugar, cornstarch, lemon juice, vanilla extract, cinnamon, ginger, and salt.
Toss gently but thoroughly until the peaches are evenly coated and the cornstarch is fully incorporated—this helps thicken the filling as it bakes.
Let this mixture sit while you prepare the crust.
I find that letting the filling macerate for 10-15 minutes allows the peaches to release their juices and develop better flavor.
Step 2: Assemble the Pie Base and Lattice
- 1 double pie crust
Preheat your oven to 425°F.
Remove the chilled pie dough from the refrigerator and roll one disk into a 12-inch circle.
Transfer it to your pie plate and let it settle into the bottom and sides—don’t trim the edges yet.
Roll the second dough disk and, using a sharp knife or pastry wheel, cut it into strips about 1/2-inch wide.
Arrange these strips in a lattice pattern over the fruit later, but have them ready.
Step 3: Fill and Top the Pie
- peach filling from Step 1
- 2 tbsp unsalted butter, cubed
- dough strips from Step 2
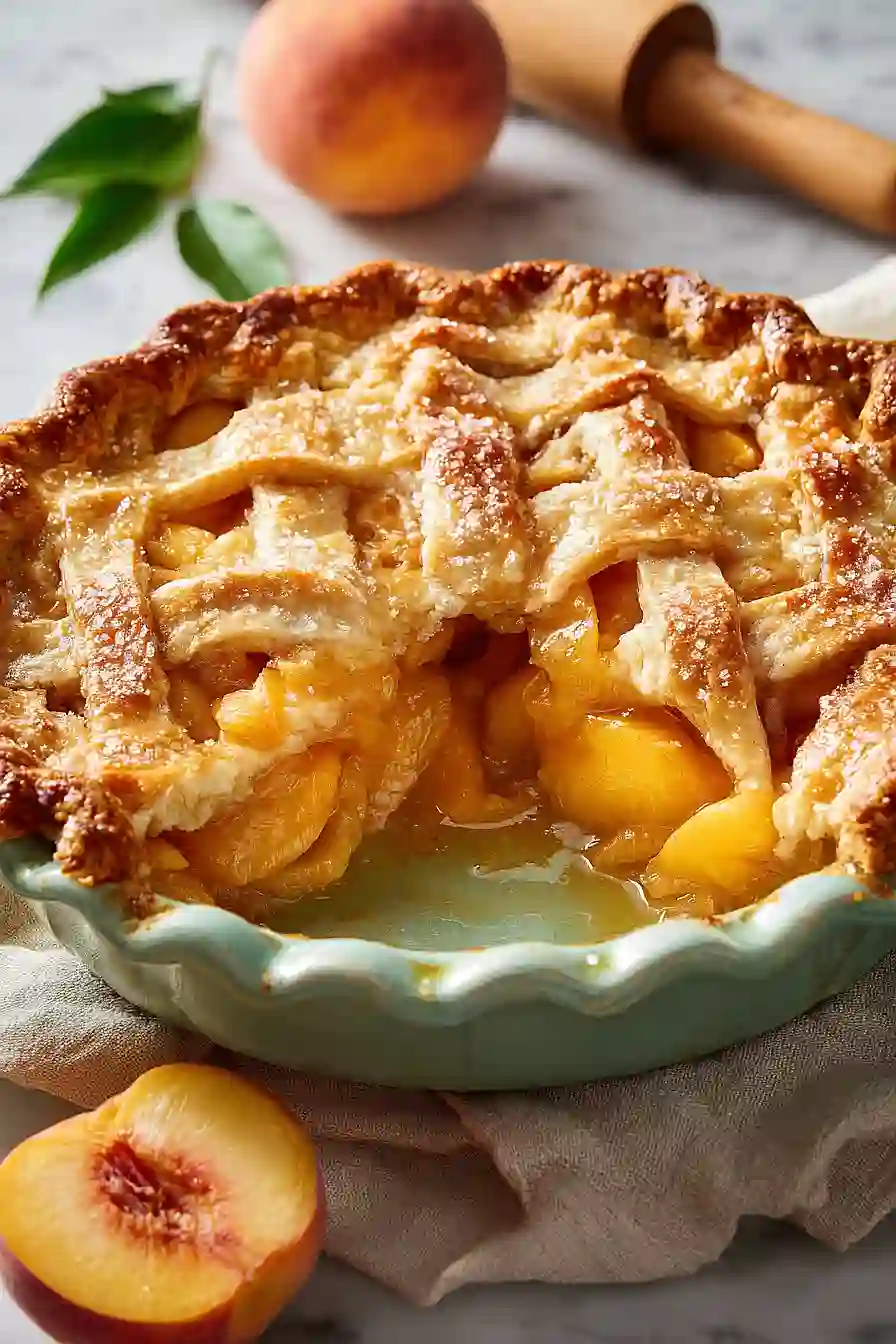
Pour the peach filling from Step 1 into the prepared crust, mounding it slightly in the center.
Dot the top with the cubed butter, which will create pockets of richness and help thicken the filling as it melts.
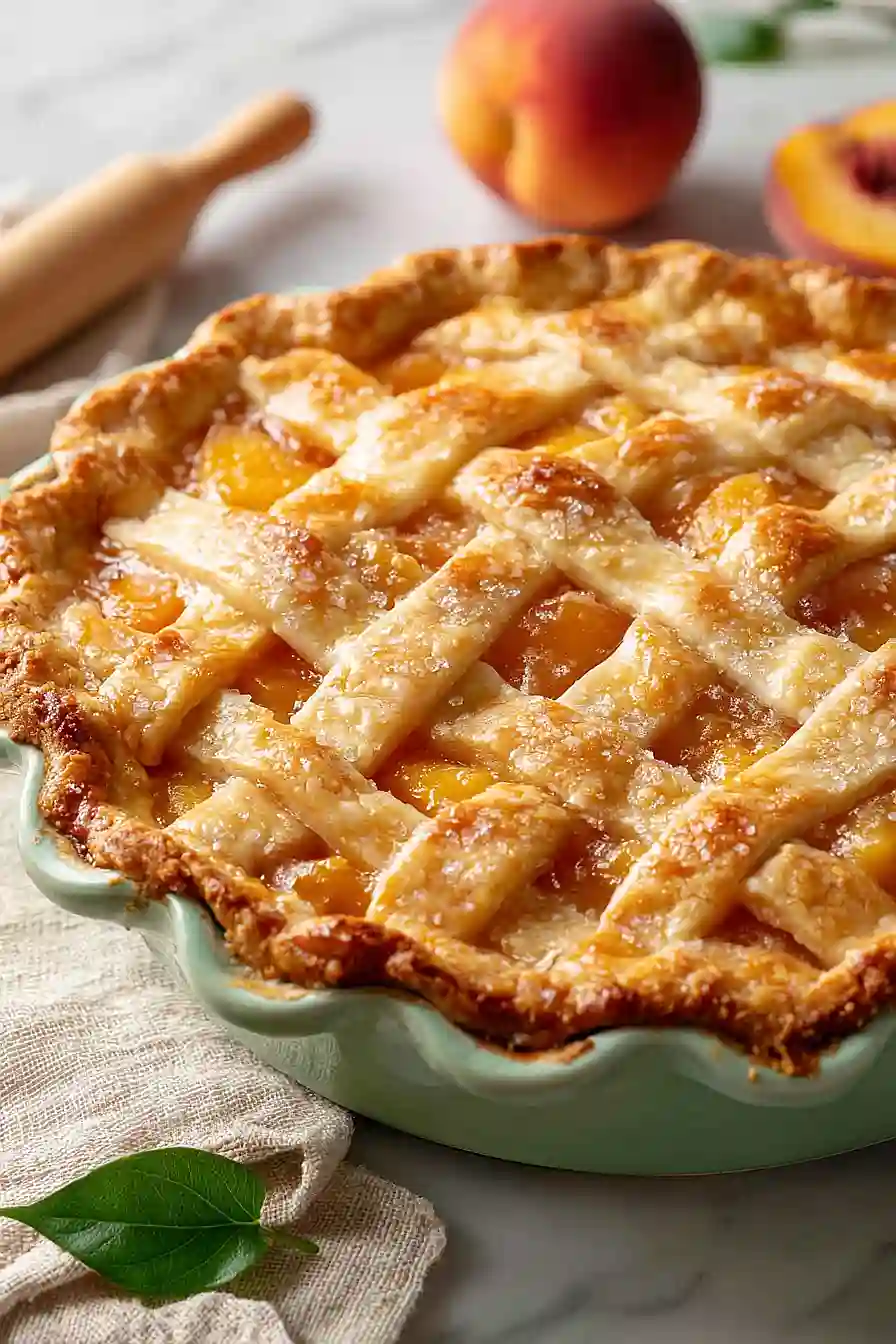
Now arrange the dough strips from Step 2 in a lattice pattern over the filling, weaving them over and under for visual appeal and even heat distribution.
Press the edges of the bottom crust and lattice strips together, then crimp or seal them decoratively using your fingers or a fork.
Step 4: Apply Egg Wash and Bake
- 1 large egg
- 1 tbsp water
- 1 1/2 tbsp turbinado sugar
In a small bowl, whisk together the egg and water to create an egg wash.
Brush this mixture generously over the lattice and crimped edges of the pie, then sprinkle the turbinado sugar over the top for a sparkling crust and subtle crunch.
Cover the edges with aluminum foil to prevent them from browning too quickly.
Place the pie in your preheated 425°F oven and bake for 20 minutes.
Step 5: Finish Baking at Lower Temperature
After 20 minutes, carefully remove the pie from the oven and reduce the heat to 375°F.
Remove the foil from the edges—the crust should already have some color and structure.
Return the pie to the oven and bake for an additional 40-50 minutes, until the crust is deep golden brown and the filling bubbles slightly at the edges.
I like to rotate the pie halfway through this second baking phase to ensure even browning, especially if your oven has hot spots.
Step 6: Cool and Set
Remove the pie from the oven and let it cool on a wire rack at room temperature for at least 4-5 hours before slicing.
This resting time is crucial—it allows the filling to set properly so the slices hold together cleanly rather than being runny.
The pie will continue to thicken as it cools, and the flavors will meld beautifully.
Traditional Peach Pie
Ingredients
Method
- Peel, pit, and slice the peaches into 1/2-inch wedges. In a large bowl, combine the sliced peaches with sugar, cornstarch, lemon juice, vanilla extract, cinnamon, ginger, and salt. Toss gently but thoroughly until the peaches are evenly coated and the cornstarch is fully incorporated—this helps thicken the filling as it bakes. Let this mixture sit while you prepare the crust. I find that letting the filling macerate for 10-15 minutes allows the peaches to release their juices and develop better flavor.
- Preheat your oven to 425°F. Remove the chilled pie dough from the refrigerator and roll one disk into a 12-inch circle. Transfer it to your pie plate and let it settle into the bottom and sides—don't trim the edges yet. Roll the second dough disk and, using a sharp knife or pastry wheel, cut it into strips about 1/2-inch wide. Arrange these strips in a lattice pattern over the fruit later, but have them ready.
- Pour the peach filling from Step 1 into the prepared crust, mounding it slightly in the center. Dot the top with the cubed butter, which will create pockets of richness and help thicken the filling as it melts. Now arrange the dough strips from Step 2 in a lattice pattern over the filling, weaving them over and under for visual appeal and even heat distribution. Press the edges of the bottom crust and lattice strips together, then crimp or seal them decoratively using your fingers or a fork.
- In a small bowl, whisk together the egg and water to create an egg wash. Brush this mixture generously over the lattice and crimped edges of the pie, then sprinkle the turbinado sugar over the top for a sparkling crust and subtle crunch. Cover the edges with aluminum foil to prevent them from browning too quickly. Place the pie in your preheated 425°F oven and bake for 20 minutes.
- After 20 minutes, carefully remove the pie from the oven and reduce the heat to 375°F. Remove the foil from the edges—the crust should already have some color and structure. Return the pie to the oven and bake for an additional 40-50 minutes, until the crust is deep golden brown and the filling bubbles slightly at the edges. I like to rotate the pie halfway through this second baking phase to ensure even browning, especially if your oven has hot spots.
- Remove the pie from the oven and let it cool on a wire rack at room temperature for at least 4-5 hours before slicing. This resting time is crucial—it allows the filling to set properly so the slices hold together cleanly rather than being runny. The pie will continue to thicken as it cools, and the flavors will meld beautifully.