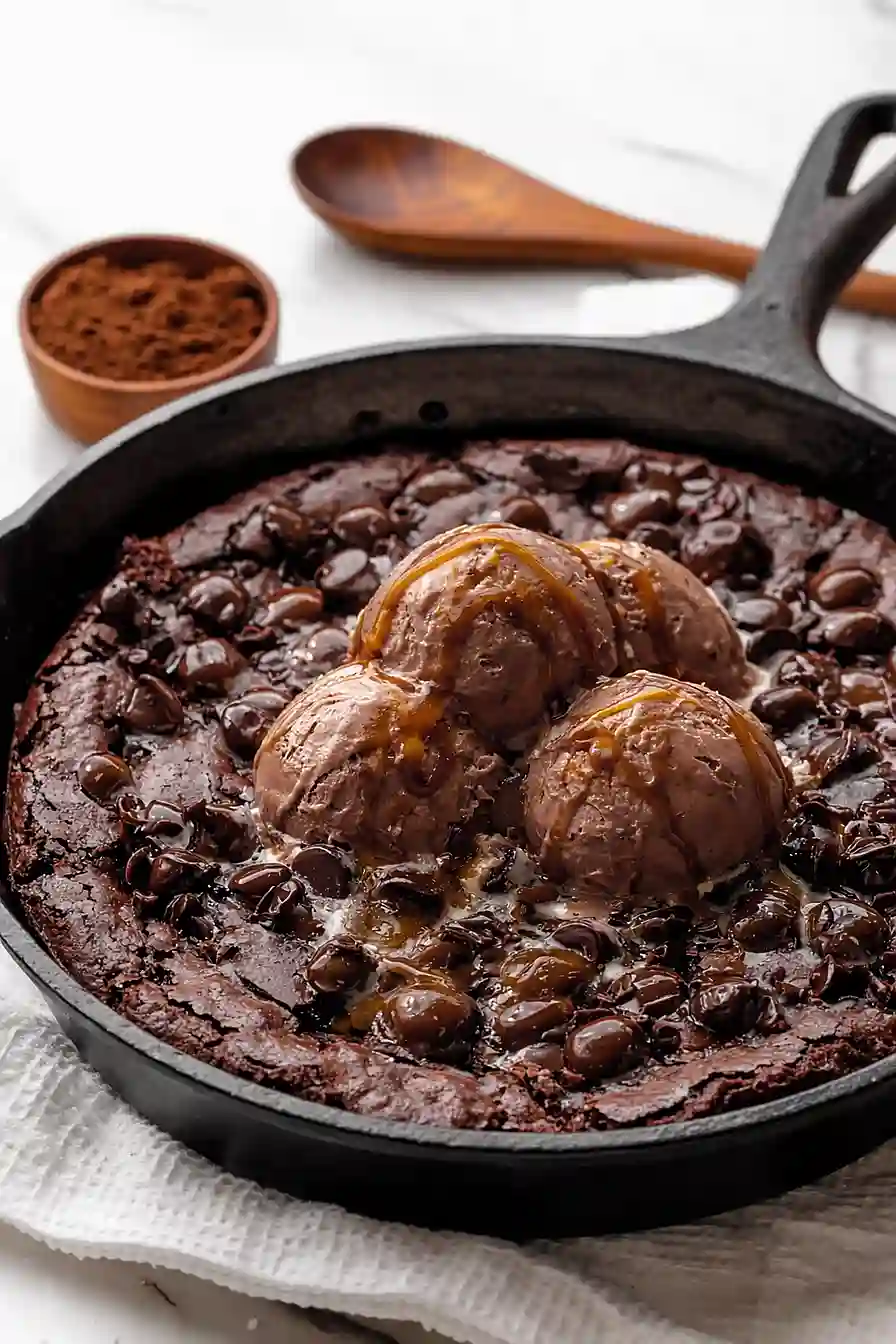
There’s something special about brownies baked in a cast iron skillet that just hits different. Maybe it’s the crispy edges that form around the pan, or the way the center stays perfectly fudgy and gooey, but skillet brownies have become my family’s favorite weekend treat—and honestly, they’re easier to make than traditional pan brownies.
These cast iron skillet brownies are rich, chocolatey, and come together in about an hour from start to finish. Plus, there’s something fun about serving dessert straight from the skillet at the table, letting everyone dig in with their forks while the brownies are still warm.
Why You’ll Love These Cast Iron Skillet Brownies
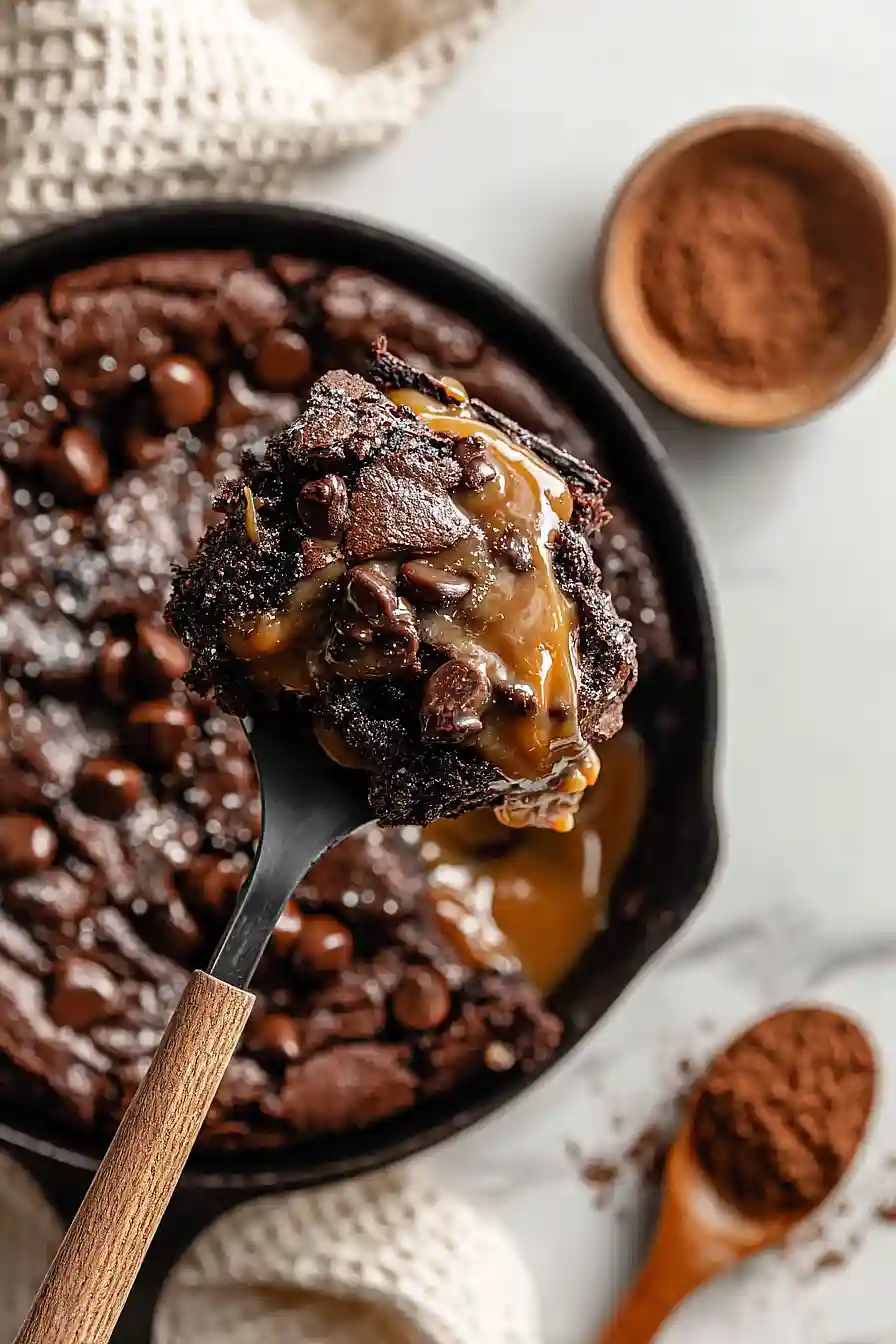
- Crispy edges with a fudgy center – The cast iron skillet creates perfectly crispy, caramelized edges while keeping the middle soft and gooey—it’s the best of both worlds in every slice.
- Easy one-pan dessert – You can mix everything and bake it all in the same skillet, which means less cleanup and more time enjoying your brownies.
- Perfect for sharing – Serve these straight from the skillet at the table with some ice cream on top, and watch everyone dig in together for a fun, casual dessert experience.
- Rich chocolate flavor – With both cocoa powder and melted chocolate plus extra chocolate chips throughout, these brownies deliver serious chocolate satisfaction in every bite.
What Kind of Chocolate Should I Use?
For this recipe, you’ll need chocolate in two forms – bar chocolate for melting and chocolate chips for mixing in. When it comes to the 4 ounces of bar chocolate, semi-sweet or bittersweet chocolate works great, and you can even use dark chocolate if you prefer a richer, less sweet brownie. The chocolate chips can be whatever you have on hand – semi-sweet is the classic choice, but milk chocolate chips will make your brownies sweeter, while dark chocolate chips add intensity. Don’t stress too much about using fancy chocolate here since you’re also using cocoa powder, so a good quality supermarket brand will do the job just fine.
Options for Substitutions
These brownies are pretty forgiving when it comes to swaps, so here are some options:
- Butter: You can replace some or all of the butter with coconut oil for a slightly different flavor. Just make sure it’s melted and cooled a bit before mixing with the eggs.
- Vegetable oil: Canola oil, melted coconut oil, or even melted butter work just as well here. The oil keeps the brownies moist, so don’t skip it entirely.
- Chocolate: Any chocolate works – semi-sweet, dark, or milk chocolate bars. You can also use chocolate chips if that’s what you have, though bars tend to melt more smoothly.
- Cocoa powder: Dutch-process or natural cocoa both work fine. If you only have hot cocoa mix, skip it – it contains sugar and milk powder that will throw off the recipe.
- All-purpose flour: For a gluten-free version, use a 1-to-1 gluten-free flour blend. The texture will be slightly different but still tasty.
- Chocolate chips: Feel free to use chopped chocolate bars, white chocolate chips, peanut butter chips, or even butterscotch chips. You can also add nuts like walnuts or pecans instead.
Watch Out for These Mistakes While Baking
The biggest mistake when making skillet brownies is not letting the chocolate mixture cool enough before adding the eggs, which can scramble them and ruin the texture – give it a full 5 minutes and make sure you can comfortably touch the side of the pot before proceeding.
Overbaking is another common issue that leads to dry, cakey brownies instead of fudgy ones, so pull them out when a toothpick inserted in the center comes out with a few moist crumbs (not completely clean).
Since cast iron retains heat and continues cooking the brownies even after you remove them from the oven, it’s smart to check for doneness around the 28-minute mark to avoid that crusty, overdone edge.
Finally, skipping the greasing step or not greasing thoroughly will make serving a nightmare, so use plenty of butter or cooking spray and get into all the corners of your skillet.
What to Serve With Cast Iron Skillet Brownies?
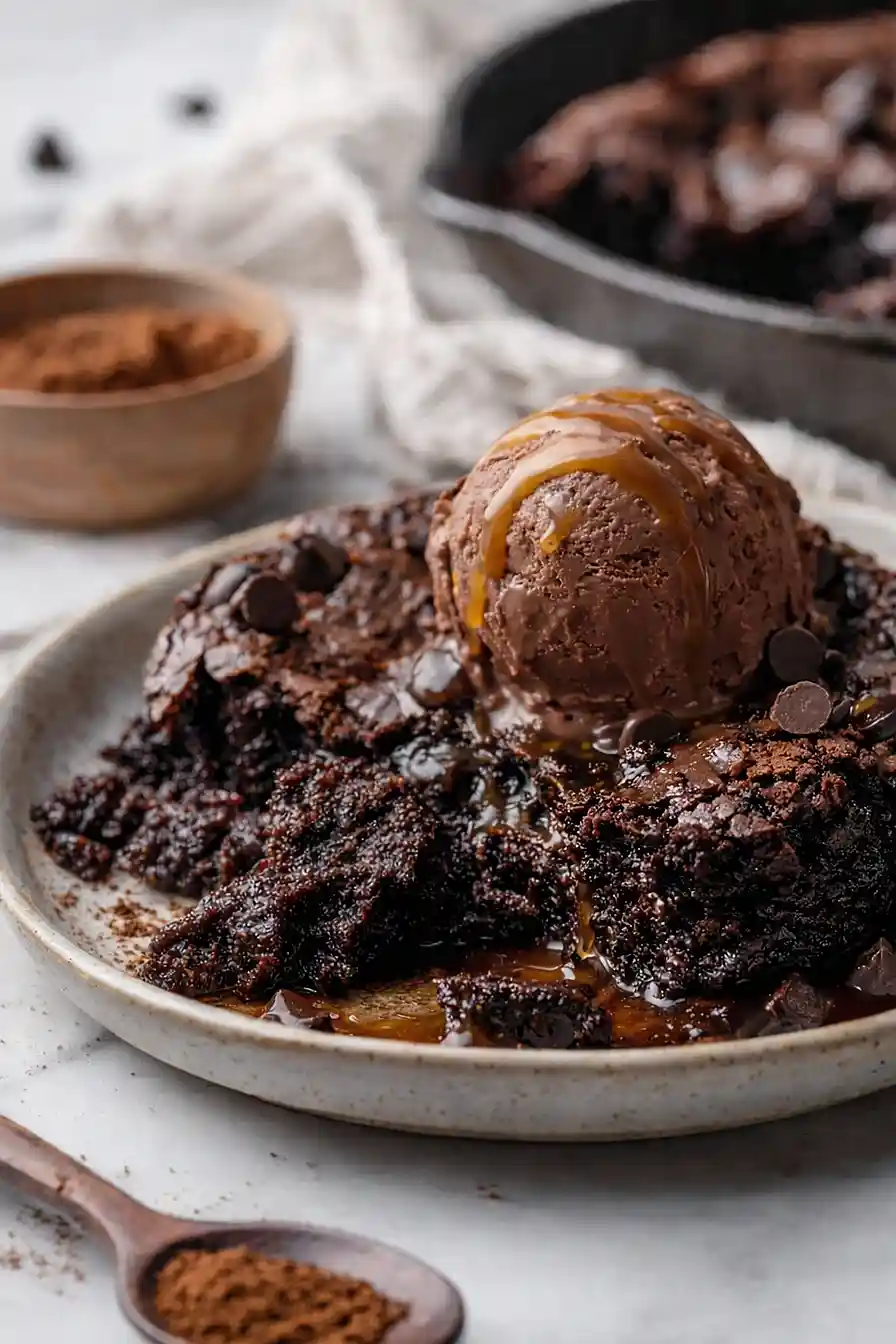
The best way to serve skillet brownies is straight from the cast iron with a big scoop of vanilla ice cream on top – the warm brownies and cold ice cream combo is absolutely perfect. You can also drizzle some caramel or hot fudge sauce over the whole thing if you’re feeling extra indulgent. For a fun party dessert, set out the warm skillet with bowls of different toppings like whipped cream, fresh berries, chopped nuts, or even a sprinkle of sea salt so everyone can customize their own serving. A cold glass of milk on the side is always a good call too, especially if you’re going for that nostalgic dessert vibe.
Storage Instructions
Store: Keep your brownies right in the cast iron skillet covered with foil or plastic wrap at room temperature for up to 3 days. If you want them to last longer, transfer them to an airtight container and refrigerate for up to a week – they’ll get a bit fudgier when cold, which I actually love!
Freeze: Cut the brownies into squares and wrap them individually in plastic wrap, then place in a freezer bag for up to 3 months. This way you can grab just one or two whenever a chocolate craving hits without thawing the whole batch.
Enjoy: For the best texture, let refrigerated brownies sit at room temperature for about 20 minutes before eating. Frozen brownies can be thawed on the counter for an hour, or you can microwave them for 15-20 seconds for that fresh-from-the-oven warmth.
| Preparation Time | 15-30 minutes |
| Cooking Time | 30-40 minutes |
| Total Time | 45-70 minutes |
| Level of Difficulty | Medium |
| Servings | 8 slices |
Estimated Nutrition
Estimated nutrition for the whole recipe (without optional ingredients):
- Calories: 3700-4100
- Protein: 40-50 g
- Fat: 230-260 g
- Carbohydrates: 400-440 g
Ingredients
For the brownie batter:
- 14 tbsp butter (I like Kerrygold unsalted butter for this)
- 2 tbsp vegetable oil
- 5 oz chocolate (chopped into 1/2-inch pieces for even melting)
- 1.25 cups sugar
- 3 eggs (room temperature, about 70°F)
- 2 tsp vanilla essence
- 0.5 cup cocoa powder (I use Ghirardelli Majestic for a deeper color)
- 1 cup flour
- 0.75 tsp salt
- 1/4 tsp espresso powder
- 1 cup chocolate chips
For the topping:
- 2 tbsp chocolate chips (optional but recommended for a professional look)
Step 1: Prepare Mise en Place and Preheat
- 5 oz chocolate, chopped
- butter for greasing the skillet
Chop the 5 oz chocolate into roughly 1/2-inch pieces for even melting, and measure out all remaining ingredients into separate bowls.
Preheat your oven to 350°F and generously grease a 10-12 inch cast iron skillet with butter or oil, making sure to coat the bottom and sides evenly—this ensures the brownies release cleanly and develop a slightly crispy edge.
Step 2: Melt Chocolate and Sugar Base
- 14 tbsp butter
- 2 tbsp vegetable oil
- 5 oz chocolate, chopped
- 1.25 cups sugar
Combine 14 tablespoons butter, 2 tablespoons vegetable oil, and the chopped chocolate in a medium saucepan over medium heat.
Stir frequently as the mixture melts, then add 1.25 cups sugar and continue stirring until the mixture is smooth and the sugar is fully dissolved, about 5 minutes total.
Remove from heat and let cool for 5 minutes—this cooling period is crucial because it prevents the eggs from scrambling when you add them.
I like to use high-quality butter like Kerrygold here because it adds a subtle richness that elevates the final brownie.
Step 3: Incorporate Eggs and Vanilla
- 3 eggs
- 2 tsp vanilla essence
- chocolate mixture from Step 2
Once the chocolate mixture has cooled slightly, whisk in the 3 room-temperature eggs one at a time, stirring well after each addition to fully incorporate them into the mixture.
Add 2 teaspoons vanilla essence and stir until the batter is smooth and glossy.
Using room-temperature eggs helps them blend seamlessly with the warm chocolate without creating clumps.
Step 4: Build the Dry Ingredient Mixture
- 0.5 cup cocoa powder
- 1 cup flour
- 0.75 tsp salt
- 1/4 tsp espresso powder
In a separate bowl, whisk together 0.5 cup cocoa powder, 1 cup flour, 0.75 teaspoon salt, and 1/4 teaspoon espresso powder.
This combination of cocoa and a hint of espresso deepens the chocolate flavor without making the brownies taste like coffee—I use Ghirardelli Majestic cocoa powder specifically because it creates a richer, darker color in the final brownies.
Step 5: Combine Wet and Dry Ingredients
- dry ingredient mixture from Step 4
- wet mixture from Step 3
- 1 cup chocolate chips
Pour the dry ingredient mixture from Step 4 into the wet chocolate mixture from Step 3.
Using a spatula or wooden spoon, gently fold the ingredients together until just combined—avoid overmixing, as this can develop too much gluten and result in tough brownies.
Fold until you see just a few streaks of dry ingredients remaining, then add the 1 cup chocolate chips and fold them in gently until evenly distributed throughout the batter.
Step 6: Bake the Brownies
- batter from Step 5
- 2 tbsp chocolate chips
Pour the batter into the prepared cast iron skillet and smooth the top with a spatula.
Sprinkle the optional 2 tablespoons chocolate chips evenly across the surface—this creates a professional, finished appearance and adds extra chocolate flavor to the top layer.
Place the skillet in the preheated 350°F oven and bake for 30–36 minutes.
The brownies are done when a toothpick inserted into the center comes out with just a few moist crumbs clinging to it; you want fudgy brownies, not completely set ones.
Step 7: Cool and Serve
Remove the skillet from the oven and let the brownies cool in the pan for at least 5 minutes before slicing—this allows them to set enough to cut cleanly while still maintaining that fudgy interior.
Serve warm from the skillet for the best texture and temperature, or let cool completely and store in an airtight container.
Gooey Cast Iron Skillet Brownies
Ingredients
Method
- Chop the 5 oz chocolate into roughly 1/2-inch pieces for even melting, and measure out all remaining ingredients into separate bowls. Preheat your oven to 350°F and generously grease a 10-12 inch cast iron skillet with butter or oil, making sure to coat the bottom and sides evenly—this ensures the brownies release cleanly and develop a slightly crispy edge.
- Combine 14 tablespoons butter, 2 tablespoons vegetable oil, and the chopped chocolate in a medium saucepan over medium heat. Stir frequently as the mixture melts, then add 1.25 cups sugar and continue stirring until the mixture is smooth and the sugar is fully dissolved, about 5 minutes total. Remove from heat and let cool for 5 minutes—this cooling period is crucial because it prevents the eggs from scrambling when you add them. I like to use high-quality butter like Kerrygold here because it adds a subtle richness that elevates the final brownie.
- Once the chocolate mixture has cooled slightly, whisk in the 3 room-temperature eggs one at a time, stirring well after each addition to fully incorporate them into the mixture. Add 2 teaspoons vanilla essence and stir until the batter is smooth and glossy. Using room-temperature eggs helps them blend seamlessly with the warm chocolate without creating clumps.
- In a separate bowl, whisk together 0.5 cup cocoa powder, 1 cup flour, 0.75 teaspoon salt, and 1/4 teaspoon espresso powder. This combination of cocoa and a hint of espresso deepens the chocolate flavor without making the brownies taste like coffee—I use Ghirardelli Majestic cocoa powder specifically because it creates a richer, darker color in the final brownies.
- Pour the dry ingredient mixture from Step 4 into the wet chocolate mixture from Step 3. Using a spatula or wooden spoon, gently fold the ingredients together until just combined—avoid overmixing, as this can develop too much gluten and result in tough brownies. Fold until you see just a few streaks of dry ingredients remaining, then add the 1 cup chocolate chips and fold them in gently until evenly distributed throughout the batter.
- Pour the batter into the prepared cast iron skillet and smooth the top with a spatula. Sprinkle the optional 2 tablespoons chocolate chips evenly across the surface—this creates a professional, finished appearance and adds extra chocolate flavor to the top layer. Place the skillet in the preheated 350°F oven and bake for 30–36 minutes. The brownies are done when a toothpick inserted into the center comes out with just a few moist crumbs clinging to it; you want fudgy brownies, not completely set ones.
- Remove the skillet from the oven and let the brownies cool in the pan for at least 5 minutes before slicing—this allows them to set enough to cut cleanly while still maintaining that fudgy interior. Serve warm from the skillet for the best texture and temperature, or let cool completely and store in an airtight container.